Review based on a production Sigma DP1, Firmware V1.0.1
The Sigma DP1 is without doubt one of the most eagerly anticipated cameras of late, certainly in the compact camera sector. Sigma first presented a concept prototype of the DP1 at Photokina 2006 but the first production models only hit the shelves in March this year. Interest in the camera was so big that Sigma even took the very unusual step of explaining the delay in an official statement (unforeseen image quality problems which resulted in a requirement to change the specification of the camera's imaging pipeline).
So what is all the fuss about? It's the sensor. The DP1 uses the same Foveon X3 sensor as Sigma's SD14 DSLR and that makes it the first compact camera ever to be made with an SLR-sized sensor (it's around the same size as the Four-Thirds format). But not only the sensor differentiates the new Sigma from the zillions of compact cameras that are currently available. With its no-nonsense feature set and 28mm (35mm equiv.) prime lens the DP1 is a million miles away from the superzooms, smile modes and face detection functions that are nowadays standard on so many compact digital cameras.
On its dedicated DP1 website Sigma says it 'set out to create a camera that could translate an irreplaceable instant into a work of art of the highest order'. So has Sigma succeeded in living up to its own hype? Let's find out on the following pages, starting as ever with the headline specification:
14.06 million (4.69 million x 3) Foveon X3 CMOS sensor
28mm equiv, F4 lens
RAW capture
Full manual control
TRUE image processing
230,0000 pixel, 2.5-inch LCD
Movies in 320 x 240 pixels (QVGA) @ 30 fps
Sensor size compared
As the graphic above shows, the DP1 has a considerably larger sensor area than most compact cameras, where 1/1.8" is almost as large as you'll get these days. Although not as large as the APS-C sensors found in most consumer level DSLRs, the Sigma's X3 sensor is a lot nearer than any other compact.
Foveon X3 sensor background
Terminology
Photodetector - A physical device used to capture a single color value (for a Bayer camera there is one of these per pixel location, the X3 sensor has three per pixel location)
Pixel location - A location on the final image which contains full RGB color information
What's so good about the Foveon X3 sensor?
In the example below we are simplifying things by using a 130 x 130 sensor, thus a total of 16,900 pixel locations in the output image. Obviously the same rules apply no matter many pixel locations the final image has.
Traditional "Mosaic" sensors
Digital cameras have for years used what is essentially a monochromatic (b&w) image sensor with individual color filters over each photodetector (known as the Bayer pattern and normally in a GRGB pattern). This means that each photodetector can only detect one of either red, green or blue light. Note that the green channel has twice the number of photodetectors as red or blue (this is because the majority of luminance information is carried in the green channel). A demosaic algorithm then combines the color of neighboring pixels to reproduce the scene color at that pixel location.
Red 4,225 photodetectors
Green 8,450 photodetectors
Blue 4,225 photodetectors
Output 16,900 pixel locations
Foveon's X3 sensor
Foveon's sensor instead of having a single photodetector at each pixel location has a multi-layered design which has the equivalent of a red, green and blue photodetector at each pixel location. This means that instead of having to interpolate the values of neighboring pixels the X3 sensor 'sees' full color at individual pixel locations. This is pretty much the 'holy grail' of digital image sensors, it should mean ultra sharp, detailed images with full color single pixel resolution.
Note that this is a simplified drawing of how the chip works, for more detail see our news article at the time.
Red 16,900 photodetectors
Green 16,900 photodetectors
Blue 16,900 photodetectors
Output 16,900 pixel locations
Foreword / notes
If you're new to digital photography you may wish to read some of our Digital Photography Glossary before diving into this article (it may help you understand some of the terms used).
Conclusion / recommendation / ratings are based on the opinion of the author, we recommend that you read the entire review before making any decision. Images which can be viewed at a larger size have a small magnifying glass icon in the bottom right corner of them, click to display a larger image in a new window.
To navigate this article simply use the next / previous page buttons or jump to a specific page by using the drop-down list in the navigation bar at the top of the page. You can support this site by ordering through the affiliate links shown at the bottom of each page (where available).
This article is protected by Copyright and may not be reproduced in part or as a whole in any electronic or printed medium without prior permission from the author.
Dpreview use calibrated monitors at the PC normal gamma 2.2, this means that on our monitors we can make out the difference between all of the grayscale blocks below. We recommend to make the most of this review you should be able to see the difference (at least) between X,Y and Z and ideally also A, B and C.
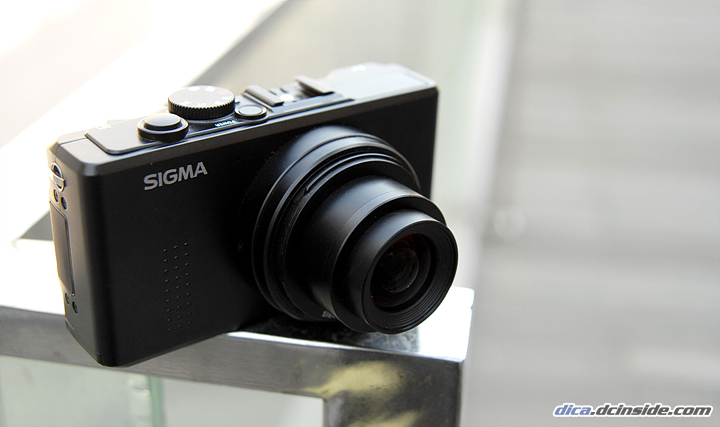
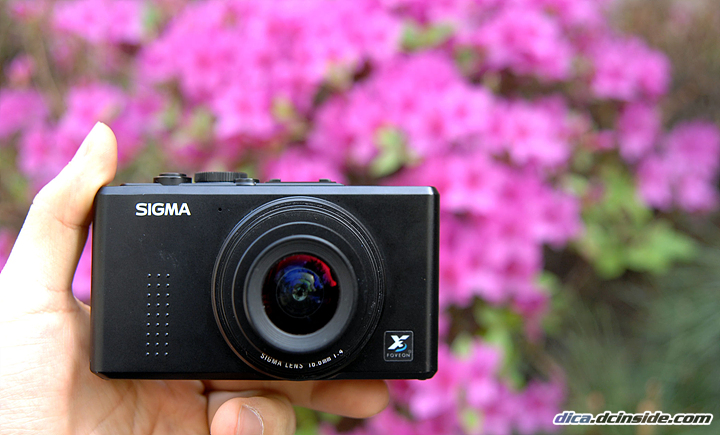
시그마 DP1에는 DSLR 카메라 SD14와 같은 크기, 성능의 Foveon 이미지 센서가 장착되었습니다. 일반 이미지 센서와 다른 특성을 가져 정확한 발색 표현과 높은 해상력을 나타내는 Foveon 센서를 탑재한 시그마 DP1은 여기에 콤팩트 카메라 사이즈 크기와 편의 기능을 가졌습니다. 특히, Foveon 센서로 동영상 촬영 기능까지 구현, DSLR과 콤팩트 카메라간의 경계를 다시한 번 좁혔습니다. DSLR/콤팩트 카메라의 장점만 모아 출시 이전부터 사용자들 사이에서 화제가 되었던 시그마 DP1. 그 성능을 통해 앞으로 콤팩트 카메라가 나아갈 미래를 살펴보겠습니다.
│직관적인 조작계 버튼. 2.5인치 LCD
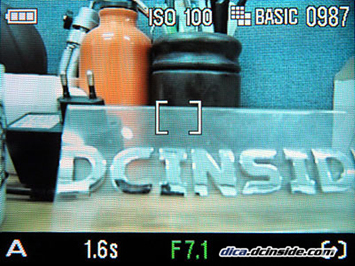
시그마 DP-1은 한손으로만 잡고 촬영할 수 있도록 조작계 버튼이 모두 오른쪽에 배열되었습니다. 조작계 버튼들은 서로 겹치지 않게 배치돼 오동작 우려가 적습니다. 사용 빈도가 높은 AEL / 노출보정 버튼과 초점 다이얼은 엄지가 닿는 부분에 있으며 사진을 리뷰할 때는 두 손으로 잡는 경우가 많은 만큼 리뷰 버튼은 촬영시 방해되지 않도록 하단에 배치했습니다. LCD는 2.5인치 23만 화소입니다. 크기, 발색 모두 평균적이지만, 어두운 곳에서는 채도가 낮아져 피사체 식별이 어렵다는 점은 아쉽습니다.
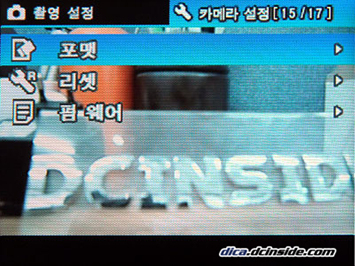
│촬영 / 기계로 나뉘어진 메뉴 구성
전원을 켠 상태에서는 LCD상에 전지 잔량, 감도와 해상도, 촬영 모드와 셔터 / 조리개값 등 기본적인 촬영 정보가 출력됩니다. 초점 영역은 흰색 사각형으로 표시되며, 초점이 맞았을 경우 녹색으로 점등되고 맞지 않은 경우 흰색으로 점멸합니다.
메뉴 버튼을 누르면 촬영 / 카메라 설정으로 이루어진 2단 메뉴가 나타납니다. 촬영 메뉴에서는 발색 파라미터 변경, 감도, 해상도와 측광까지 촬영에 관련된 모든 설정을 변경할 수 있습니다. 카메라 설정에서는 언어, LCD 밝기, 메모리 포맷 등 본체 기계 성능에 관한 모든 설정이 지원됩니다.
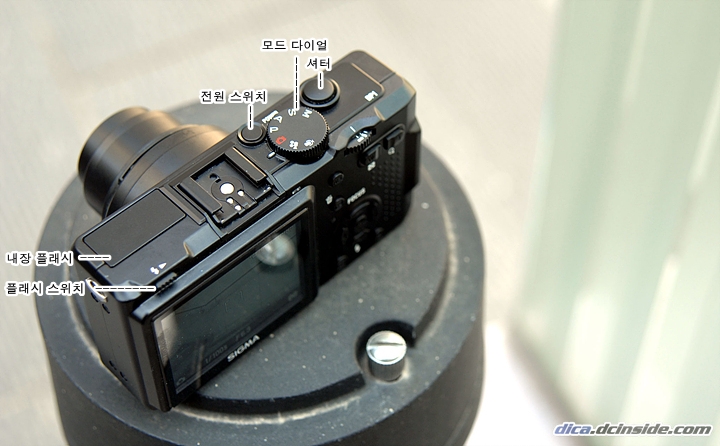
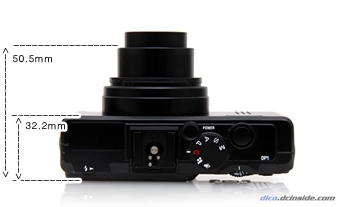
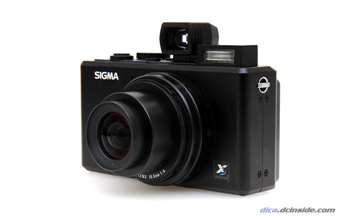
│다양한 외부 조작 버튼. 32mm 두께
제품 윗면에는 내장 플래시, 모드 다이얼과 전원 스위치, 셔터 등이 있습니다. 외장 플래시 연결용 핫 슈는 전용 플래시와 외장 뷰 파인더 접속부의 역할을 겸합니다. 모드 다이얼 구성은 P / A / S / M과 동영상, 음성녹음 메뉴입니다. 본체 두께는 32.2mm, 침동식 렌즈 돌출부까지 고려하면 약 50.5mm입니다. 전원을 끈 상태에서도 어느 정도 휴대성은 있지만, 전용 케이스나 넥 스트랩을 사용하면 휴대성과 디자인 모두 살릴 수 있습니다.
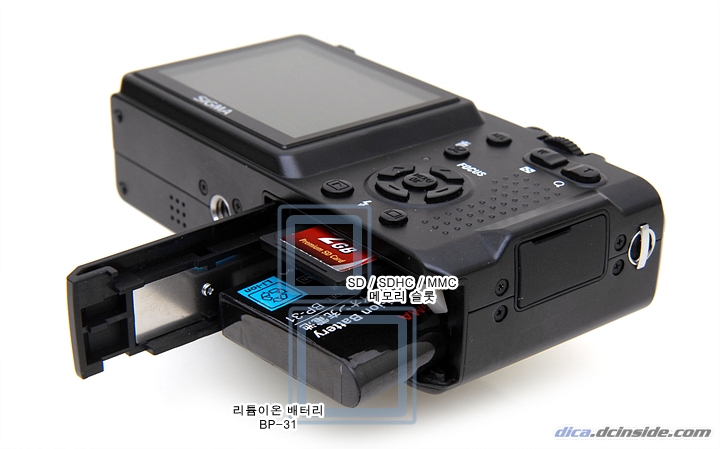
│전용 리튬이온 배터리 / SD(SDHC) 메모리 지원
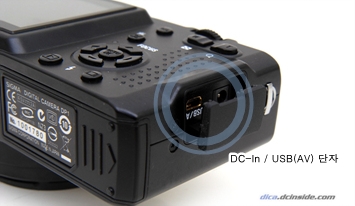
제품 하단에는 배터리 / 메모리 슬롯이 있습니다. 전원으로 1회 충전시 약 250여 매 촬영 가능한 리튬이온 배터리 BP-31을 사용합니다. 저장 매체는 SD / SDHC / MMC 메모리를 사용합니다(내장 메모리 없음). 옆면 그립부에는 DC-In / USB 단자가 있습니다. 고무 커버로 덮어 이물질 유입을 막을 수 있습니다.
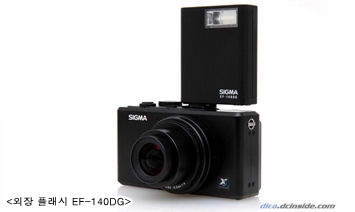
│다양한 부가 액세서리 지원
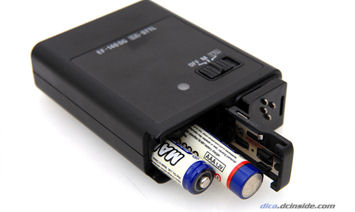
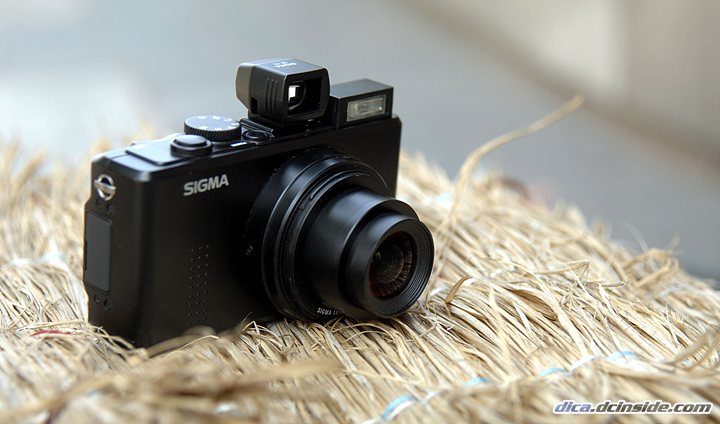
시그마 DP-1은 핫슈 부분에 연결하는 외장 파인더 VF-11 / GN 14의 외장 플래시 EF-140DG / 간섭광 차단용 렌즈 후드 HA-11 등 다양한 부가 액세서리를 지원합니다. EF-140DG는 AAA형 배터리 2개를 사용하며, 렌즈 후드 HA-11은 후드 역할과 46mm 필터 나사산의 역할을 겸합니다.
│클래식 카메라를 연상케 하는 외관과 휴대성
시그마 DP1은 모드 다이얼, 돌출형 플래시와 침동식 렌즈, 옆부분에 위치한 스트랩 고리 등, 전반적으로 클래식 필름 카메라를 연상하게 하는 외관을 지녔습니다. 그립부 지지대는 없지만 본체 두께로 인해 높은 그립감을 지녔습니다. 본체 길이는 113.3mm, 높이는 59.5mm 수준입니다.
<샘플 이미지는 모두 XSF RAW 파일로 촬영 후 SPP 2.4에서 JPEG로 변경했습니다. 기타 샤프니스, 콘트라스트 등의 보정은 없었으며, 변환시 SPP 설정은 Auto / 13.9MB입니다.>
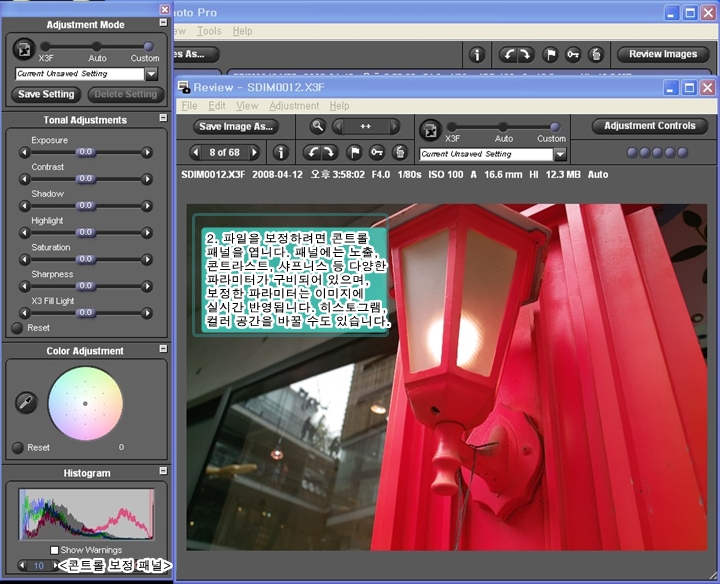
│강력한 RAW 포맷 컨버팅 프로그램, SPP(Sigma Photo Pro)
시그마 DP1은 JPEG 파일 외에 독자적은 RAW 포맷, X3F를 사용합니다. X3F 포맷 파일을 JPEG로 변환하거나 보정할 때는 기본제공되는 전용 프로그램, SPP(Sigma Photo Pro)를 설치해야 합니다. SPP는 한글메뉴를 지원하며 파라미터 변경값이 실시간 반영되기 때문에 초보 사용자들도 쉽게 접할 수 있습니다. X3F->JPEG 변환 과정에서 다양한 후보정을 가할 수 있다는 점도 매력적입니다.
│높은 해상력. 명부 / 암부 재현력도 수준급
시그마 DP1은 이미지 센서와 렌즈 특성상, 명부 / 암부 계조 표현력이 높고 중앙에서 주변까지 균일한 화질을 보여줍니다. 샘플 이미지는 X3F 파일 촬영 후 Auto / Midium옵션으로 JPEG 컨버팅한 결과물입니다. 하이라이트 부분과 어두운 부분의 색 정보와 묘사력을 확인할 수 있습니다.
표준
세피아
흑백
│3가지 컬러 모드 지원
시그마 DP-1의 컬러 모드 메뉴는 사진의 전체적인 톤을 바꿔줍니다. 일반 콤팩트 카메라에서 쉽게 볼 수 있는 기능으로, 표준과 세피아, 흑백 등 3가지 컬러 모드를 지원합니다.
콘트라스트 강
콘트라스트 하
채도 강
채도 하
샤프니스 강
샤프니스 하
│JPEG 촬영에도 대응하는 파라미터 설정 기능
시그마 DP-1은 콘트라스트 / 샤프니스 / 채도 부분 파라미터 설정 기능을 지원합니다. RAW 파일 및 컨버팅시에도 이들 파라미터를 적용할 수 있지만, JPEG 촬영시에도 사용자들이 임의로 발색을 조절할 수 있다는 면에서 장점으로 꼽을 수 있습니다.
<파라미터 설정 샘플 이미지는 JPEG로 촬영했습니다.>
ISO 100 (RAW 컨버팅)
ISO 200 (RAW 컨버팅)
ISO 400 (RAW 컨버팅)
│감도 범위는 ISO 100 ~ 800까지
시그마 DP-1은 ISO 100 ~ 800까지의 평범한 감도 조절 기능을 지원합니다. ISO 400까지는 피사체 윤곽과 노이즈 억제 능력 모두 만족스럽지만, ISO 800에서는 채도가 다소 떨어집니다.
고감도 사용시 시그마 SD14와 비슷한 특성을 보이는데, JPEG 촬영보다 RAW 촬영 후 JPEG로 컨버팅할 때 노이즈가 눈에 띄게 줄어듭니다. 촬영 후 저장 시간은 JPEG 촬영쪽이 빠르지만, 화질과 후보정 여지를 확보하려면 RAW 포맷으로 촬영하는 것이 좋습니다.
ISO 800 (JPEG 촬영)
ISO 800 (RAW 컨버팅)
ISO 400 (JPEG 촬영)
ISO 200 (JPEG 촬영)
ISO 100 (JPEG 촬영)
│320 x 240 해상도 초당 30프레임 동영상 촬영 기능 지원
시그마 DP-1은 Foveon 센서를 사용하면서도 동영상 촬영 기능을 지원, 사용자들의 눈길을 끌었습니다. 시그마 DP-1의 동영상 촬영 성능은 평균급으로, 320 x 240 해상도에 초당 30프레임 동영상을 촬영할 수 있습니다. 영상 촬영 중에는 디지털 줌을 사용할 수 있지만, 디지털 줌 사용시 화상이 거칠어지며 잡음이 녹음되기 때문에 간단한 기록용으로만 사용하는 것이 좋습니다.
│편의성을 개선한 후속 모델을 기다리며
시그마 DP1은 대형 이미지 센서를 장착한 콤팩트 카메라 1호가 되었습니다. 기술의 발달로 인해, 사용자들은 제 2, 제 3의 시그마 DP1을 기대할 수 있게 되었습니다. 이미 화질, 발색면에서는 높은 평가를 받고 있는 시그마 DP1. 그렇기에 이제는 더욱 향상된 동영상 기능, 빨라진 동작 속도와 렌즈 성능을 기대해봄직 합니다. 시그마 DP1은 그 자체로도 만족스러운 모델이지만, 이러한 면에서 후속 모델을 더욱 기다려지게끔 하는 디지털 카메라입니다. DSLR 카메라의 고화질, 콤팩트 카메라의 휴대성을 한 번에 맛보려는 사용자들에게 시그마 DP1은 최적의 선택이 될 것입니다.